
Photo by Agê Barros on Unsplash
Creating a Clock-Component using QML
1/3 Building and Publishing Qt-Framework Plugins with GitHub-Actions step by step


What is QML?
"QML" stands for "Qt Modelling Language" and is used within the Qt framework for the creation of a UI. It is a declarative programming language and a component of QtQuick (Qt User Interface Creation Kit). QML also has a C++ and JavaScript API, which enables developers to create their own QML types using C++ or JavaScript.
To follow this article, you should have at least Qt6 and the IDE QtCreator installed and know how to create a QtQuick project.
Creation of the Components
The creation of the components is limited to the following modules in this simple example: ClockBackground.qml and GenericClockHand.qml. In Qt-Creator 9.0.1 you can create a QML file by:
right-clicking on the
qml.qrcfile in your projectAdd New
Qt
QML File (Qt Quick 2).
💡 I changed the directory structure in my project so that my
qml.qrcfile is located in./qml/qml.qrcand added a subdirectory calledClockfor the final component.
TimeMarker (ClockBackground.qml)
In the first part of this component, a wrapper rectangle is created. This rectangle is transparent color: "transparent" and has a fixed radius. In addition, 3 properties are defined in this wrapper rectangle:
size- the size of the clock (can be adjusted later)hourCount- the number of time markers the clock is usingprimaryColor- the colour for the time markers
💡 As a best practice, note that I used the
readonlykeyword for properties, that won't change.
import QtQuick 2.9

Rectangle
{
    id: clockBackground
    width: size
    height: width
    radius: width / 4
    color: "transparent"

    property int size: 200

    readonly property int hourCount: 12
    readonly property color primaryColor: "#141414"

    Rectangle
    {
        id: middlePoint
        ...
    }

    Repeater
    {
        id: repeater
        ...
    }
}
Now I create the middle point of the clock with the help of a rectangle, for which the following applies: width = height = radius. Note, that I use anchors.centerIn: parent to anchor the point in the center of the parent.
Rectangle
{
    id: middlePoint
    width: size / 20
    height: size / 20
    anchors.centerIn: parent
    radius: width
    color: primaryColor
}
In this part, I use the Repeater component to create the black time markers. In general, there is a model and a delegate - similar to the ListView. In this case, the property model is given a numeric value. Thus, hourCount many delegates are created. Delegates describe the appearance of an individual item of the repeater.
In the first part of the delegate, the placement in x- and y-direction is configured as well as the width and height. The second part is a little more demanding at first glance. You can transform QML components. For example, I use the component Rotation to calculate the correct rotation angle index * (360 / hourCount) for each item. The property index is from the Repeater component itself. index 0 is 12 o'clock, index 1 is 1 o'clock, and so on.
The Translate component is to be understood as a kind of radius for the time markers. The markers should always keep a distance of middleY from the centre.
Repeater
{
    id: repeater
    model: hourCount
    delegate: Rectangle
    {
        id: delegate
        width: 5
        height: 15
        x: middleX
        y: middleY
        color: primaryColor

        readonly property int middleX: (size / 2) - (delegate.width / 2)
        readonly property int middleY: (size / 2) - (delegate.height / 2)

        transform:
        [
            Translate
            {
                // is like the radius of the clock
                // so its everytime inside of the clockBackground-Rectangle
                y: middleY
            },
            Rotation
            {
                angle: index * (360 / hourCount)
                origin.x: delegate.width / 2
                origin.y: delegate.height / 2
            }
        ]
    }
}
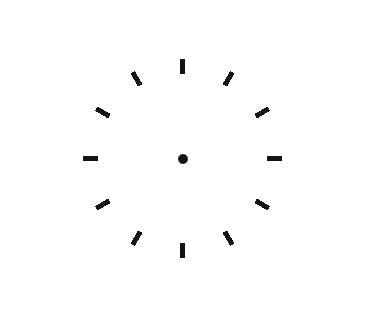
The intermediate result should now look like this:
ClockHands (GenericClockHand.qml)
In this part, a reusable clock hand is created. I define maxSize so that no hand is larger than the radius of the clock. I set the width, height and placement again. However, the tranformOrigin is now set to the bottom of the item Item.Bottom for the following animation.
With the component RotationAnimation I can determine the properties and the behaviour of the animation.
💡 The property
animationDurationSecondscan be changed later for the concrete ClockHands.
import QtQuick 2.9

Rectangle
{
    id: genericClockHand
    color: "red"
    width: 2
    height: parent.height / 3
    x: (parent.width / 2) - (width / 2)
    y: Math.abs(maxSize - height)
    transformOrigin: Item.Bottom

    property int animationDurationSeconds: 60000
    readonly property int maxSize: parent.height / 2

    RotationAnimation on rotation
    {
        from: 0
        to: 360
        duration: animationDurationSeconds
        loops: Animation.Infinite
    }
}
This code snippet shows an example of how to use the GenericClockHand component to create a clock hand for the hours of a day.
import QtQuick 2.9

GenericClockHand
{
    id: hourClockHand
    height: parent.height / 4
    animationDurationSeconds: 43200000 // 12 * 60 * 60 * 1000
}
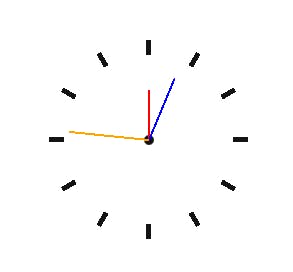
Final Implementation
To get the complete clock, you only have to merge the ClockHands and the ClockBackground.
import QtQuick 2.9

ClockBackground
{
    HourClockHand {}
    MinuteClockHand {}
    SecondClockHand {}
}
Now you can use the custom component Clock anywhere in the QML code.
💡 Note that you have to specify the folder of the .qml file of the component when importing the module. For me, it is
"./Clock". Otherwise, the component is not known to QML.
import QtQuick 2.15
import QtQuick.Window 2.15
import "./Clock"

Window
{
    id: mainWindow
    width: 640
    height: 480
    visible: true
    title: qsTr("Clock")

    Clock
    {
        id: clock
        anchors.centerIn: parent
    }
}
Next Steps
You can read here how to create a QQMLExtensionPlugin based on this project and use it in another application. Otherwise, I can highly recommend the Youtube channel KDAB to learn general things about the Qt framework and to stay up to date.
You are also welcome to expand the project. Take a look at the ReadMe of the project on GitHub.
Thank you for reading this article. Hopefully, you gained some knowledge. If you have any suggestions for improving my articles, please feel free to write them in the comments.