
Implementing a CI/CD Pipeline for a Qt Application with GitHub Actions
3/3 Building and Publishing Qt-Framework Plugins with GitHub-Actions step by step


In today's software development landscape, continuous integration and continuous delivery (CI/CD) pipelines have become indispensable. They enable developers to automate the process of building, testing, and deploying applications, resulting in faster and more reliable software delivery. In the figure below you can see the general cycle of CI/CD. In this article, I will mainly concentrate on Build and Deploy.

If you're working on a Qt application and looking to streamline your development workflow, implementing a CI/CD pipeline using GitHub Actions can be a game-changer. In this article, we'll guide you through the steps of setting up a CI/CD pipeline for your Qt application using GitHub Actions.
What is GitHub Actions and why do we use it?
GitHub Actions is a powerful and flexible platform provided by GitHub that allows you to automate various aspects of your software development workflow. It enables you to define custom CI/CD pipelines, automate tasks, and respond to events within your GitHub repository.
With GitHub Actions, you can create workflows using YAML files, which are easy to read and understand. These workflows consist of jobs, steps, and actions that define the tasks to be executed. You have the flexibility to customize your workflows based on your specific requirements and project needs.
So, why do we use GitHub Actions for implementing our CI/CD pipeline for a Qt application? Here are some key reasons:
Vast Ecosystem of Actions: There are plenty of pre-built actions available in the GitHub Marketplace.
Easy Configuration: The YAML syntax used for workflow files is straightforward and easy to understand
Centralized Workflow: Centralize your entire development workflow within your repository.
Seamless Integration: Most people use GitHub for version control and collaboration. So, utilizing GitHub Actions eliminates the need for external CI/CD platforms or complex integrations.
and so on...
How does the project look like currently?
In the first two parts of the series (1, 2), we created a QT project that simulates a clock. This was created with QML and is also made available as a QML plug-in so that it can also be used in other QT applications without any problems. If you missed this part, you can simply clone the project from my GitHub repository and start it from there.
We have the following simplified project structure:
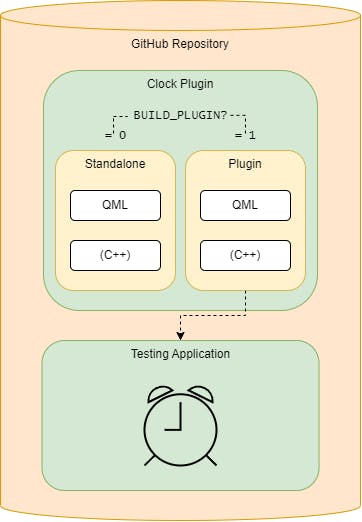
We created a Plugin, which can run as a standalone application as well as a Plugin. We got this result by using the self defined QMake parameter BUILD_PLUGIN. The Plugin can be used inside of a testing application to show the clock.
The aim of the pipeline we are going to create is to build the plugin itself and then to compile the testing application while using the built plugin. Two things are important for the result:
The pipeline should run automatically for every push, pull-request to the repository.
At the end a user can just click on the .exe file and can use the application without worrying about dependencies.
Building and Deploying the Qt Application
First, we have to create a .github directory in the top-level directory of our repository. In this directory, we create every file that has something specifically to do with GitHub. For example, you could create Pull-Request- or Issue-Templates.
But this time we want to create another directory inside .github called workflows. Here we define the build file deploy_clock_plugin_and_test_application.yaml which uses the YAML syntax. The provided YAML file represents a GitHub Actions workflow that builds two Qt applications and creates release artifacts. Here's a summary of what's happening in the workflow:
name: Windows Plugin Release

on: [push, pull_request, workflow_dispatch]
...
We can name the workflow like e. g. Windows Plugin Release. The workflow is triggered by events such as push, pull_request, and workflow_dispatch.
...
env:
  SOURCE_DIR: ${{ github.workspace }}
  QT_VERSION: 6.2.4
  CLOCK_PLUGIN_SOURCE_DIR: ${{ github.workspace }}\clock_plugin
  CLOCK_PLUGIN_ARTIFACT_WITHOUT_ZIP_ENDING: ClockPlugin
  CLOCK_PLUGIN_BUILD_DIR_NAME: buildClockPlugin
  TESTING_APPLICATION_SOURCE_DIR: ${{ github.workspace }}\testing_application
  TESTING_APPLICATION_ARTIFACT_WITHOUT_ZIP_ENDING: TestingApplication
  TESTING_APPLICATION_BUILD_DIR_NAME: buildTestingApplication
...
Environment variables are defined, including the source directories for both applications, the used Qt version, and build directories for the ClockPlugin and TestingApplication.
Now that we have defined the variables, we can start with the steps for the plugin:
...
jobs:
  build:
    runs-on: windows-2019
    steps:
      # 1
      - name: Checkout
        uses: actions/checkout@v2
        with:
          submodules: recursive
      # 2
      - name: Get all tags for correct version determination
        working-directory: ${{ env.SOURCE_DIR }}
        run: |
          git fetch --all --tags -f
      # 3
      - name: Try to cache the Qt-Installation
        id: cache-qt
        uses: actions/cache@v3
        env:
          cache-name: cache-qt
        with:
          path: ${{ runner.temp }}\Qt
          key: ${{ runner.os }}-Qt-${{ env.QT_VERSION }}
      # 4
      - if: ${{ steps.cache-qt.outputs.cache-hit != 'true' }}
        name: Install Qt
        uses: jurplel/install-qt-action@v3
        with:
          version: ${{ env.QT_VERSION }}
          host: windows
          target: desktop
          arch: win64_msvc2019_64
          dir: ${{ runner.temp }}
          setup-pyqt: false
      # 5
      - name: Download JOM
        uses: suisei-cn/actions-download-file@v1
        with:
          url: http://download.qt.io/official_releases/jom/jom.zip
          target: ${{ runner.temp }}\
      # 6
      - name: Extract JOM
        working-directory: ${{ runner.temp }}
        run: |
          7z x jom.zip
      # 7
      - name: Set up Visual Studio shell
        uses: egor-tensin/vs-shell@v2
        with:
          arch: x64
      # 8
      - name: Create ClockPlugin build directory
        run: mkdir ${{ runner.temp }}\${{ env.CLOCK_PLUGIN_BUILD_DIR_NAME }}
      # 9
      - name: Build ClockPlugin
        working-directory: ${{ runner.temp }}\${{ env.CLOCK_PLUGIN_BUILD_DIR_NAME }}
        env:
          QMAKE_OPTIONS: BUILD_PLUGIN="1"
        # have to set the path, when the Qt-Installation is cached
        run: |
          set PATH=%PATH%;..\Qt\${{ env.QT_VERSION }}\msvc2019_64\bin
          qmake -r ${{ env.CLOCK_PLUGIN_SOURCE_DIR }}\clock_plugin.pro ${{ env.QMAKE_OPTIONS }}
          ${{ runner.temp }}\jom.exe -j2
      # 10
      - name: Prepare Artifact (delete unnecessary files)
        working-directory: ${{ runner.temp }}\${{ env.CLOCK_PLUGIN_BUILD_DIR_NAME }}
        run: |
          del /Q /F imports\${{ env.CLOCK_PLUGIN_ARTIFACT_WITHOUT_ZIP_ENDING }}\*.pdb
          del /Q /F imports\${{ env.CLOCK_PLUGIN_ARTIFACT_WITHOUT_ZIP_ENDING }}\*.exp
          del /Q /F imports\${{ env.CLOCK_PLUGIN_ARTIFACT_WITHOUT_ZIP_ENDING }}\*.ilk
          del /Q /F imports\${{ env.CLOCK_PLUGIN_ARTIFACT_WITHOUT_ZIP_ENDING }}\*.lib
      # 11
      - name: Save the ClockPlugin artifact
        uses: actions/upload-artifact@v2
        with:
          name: ${{ env.CLOCK_PLUGIN_ARTIFACT_WITHOUT_ZIP_ENDING }}
          path: ${{ runner.temp }}\${{ env.CLOCK_PLUGIN_BUILD_DIR_NAME }}\imports\${{ env.CLOCK_PLUGIN_ARTIFACT_WITHOUT_ZIP_ENDING }}
        ...
The workflow performs the following steps:
Checkout: Retrieves the source code of the repository.
Get all tags: Fetches all tags to determine the correct version.
Cache the Qt Installation: Attempts to cache the Qt installation to speed up subsequent builds.
Install Qt: Installs the specified Qt version if it is not found in the cache.
Download JOM: Downloads the JOM build tool required for the build process (especially for parallel building).
Extract JOM: Extracts the downloaded JOM tool using 7zip.
Set up Visual Studio shell: Sets up the Visual Studio shell for building the applications.
Create ClockPlugin build directory.
Build ClockPlugin: Builds the ClockPlugin application using
qmakeandJOM.Prepare Artifact: Removes unnecessary files from the ClockPlugin build.
Save the ClockPlugin artifact: Uploads the ClockPlugin build artifacts as an artifact.
...
# 1
- name: Create TestingApplication build directory
  run: mkdir ${{ runner.temp }}\${{ env.TESTING_APPLICATION_BUILD_DIR_NAME }}
# 2
- name: Build TestingApplication
  working-directory: ${{ runner.temp }}\${{ env.TESTING_APPLICATION_BUILD_DIR_NAME }}
  # have to set the path, when the Qt-Installation is cached
  run: |
    set PATH=%PATH%;..\Qt\${{ env.QT_VERSION }}\msvc2019_64\bin
    qmake -r ${{ env.TESTING_APPLICATION_SOURCE_DIR }}\testing_application.pro
    ${{ runner.temp }}\jom.exe -j2
    windeployqt --qmldir ${{ env.TESTING_APPLICATION_SOURCE_DIR }} --release --compiler-runtime --no-translations --verbose 2 .\release
# 3
- name: Copy ClockPlugin to buildTestingApplication directory
  run : |
    xcopy /E /I /Y ${{ runner.temp }}\${{ env.CLOCK_PLUGIN_BUILD_DIR_NAME }}\imports\${{ env.CLOCK_PLUGIN_ARTIFACT_WITHOUT_ZIP_ENDING }} ${{ runner.temp }}\${{ env.TESTING_APPLICATION_BUILD_DIR_NAME }}\release\${{ env.CLOCK_PLUGIN_ARTIFACT_WITHOUT_ZIP_ENDING }}
# 4
- name: Save the TestingApplication artifact
  uses: actions/upload-artifact@v2
  with:
    name: ${{ env.TESTING_APPLICATION_ARTIFACT_WITHOUT_ZIP_ENDING }}
    path: ${{ runner.temp }}\${{ env.TESTING_APPLICATION_BUILD_DIR_NAME }}\release
...
Create TestingApplication build directory.
Build TestingApplication: Builds the TestingApplication using
qmake,JOM, andwindeployqtfor deployment.Copy ClockPlugin to TestingApplication directory: Copies the ClockPlugin build artifacts to the TestingApplication build.
Save the TestingApplication artifact: Uploads the TestingApplication build artifacts as an artifact.
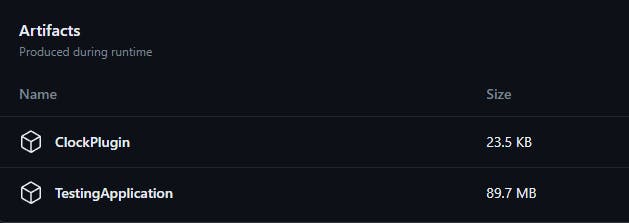
If the build finishes without any errors you can download the artefacts the pipeline created and e. g. run the TestingApplication.
What I have learned?
In retrospect, one could split the single workflow file into 2 files. This would be much clearer and more open for extensions. On the other hand, this would increase the effort that the system behind GitHub Actions has to put in, which can lead to higher costs. This is because you would have to cache and install Qt twice and so on.
In addition, I would now use CMake to create the project, as this is only supported by Qt in newer versions. Don't worry: Older projects created with QMake can still be imported.
You could also use Docker to deploy and build the projects using containers. The advantage would be that only the most necessary resources would be used, which would bring a speed advantage.
Conclusion
Congratulations! You've successfully implemented a CI/CD pipeline for your Qt application using GitHub Actions. By automating the build, test, and deployment process, you can save time, increase productivity, and ensure the reliability of your software. Remember to continuously refine and enhance your pipeline to meet the evolving needs of your project.
Remember, this article provides a high-level overview of setting up a CI/CD pipeline for a Qt application using GitHub Actions. It's essential to tailor the process to your specific project requirements and explore the documentation and resources provided by Qt and GitHub Actions to gain a deeper understanding of the tools and configurations available.
I hope that this series helped you understand the Qt Framework a little bit more. Happy coding and deploying! ♥️